
A few weeks ago while working on a weekend side project, I wanted to try to get an image from the web to display on my Pebble smartwatch. My end goal was to be able to press a button on my watch, and get a snapshot from an IP camera running on my home network. In case you’re curious, yes, this is so I could check on our baby from my watch. Because I can ?
Fortunately Pebble provides sample code that displays a PNG from the web. The watch is paired to a smartphone which actually does the download, and then sends it to the watch over bluetooth. The sample code meant getting the image onto the device was actually the easy part. The part that I was left to figure out was how to get my image into a format that would be optimized for the Pebble’s screen. File size optimization was key, because the bandwidth between the watch and the phone is actually pretty low. This blog post is about my adventure to build a small Node.js server that could format an image in just the right way for my Pebble.
While I was optimizing an image for a tiny, 180×180, 64 color screen, there are plenty of other times where you might want to alter an image “on the fly” like I did. For instance, you might want to build a dynamic thumbnail system for a photo gallery. Or you might want to put your studio’s watermark on a larger preview of a photo that you took.
Node.js streams
Node.js streams are awesome for these types of things, because they let you do all your manipulations in memory, without having to write an intermediate file to disk. If you aren’t familiar with how streams work in Node, you should definitely check them out.
Because an HTTP web request can also be a stream, you don’t even have to have the file that you want to manipulate on your local filesystem. This is especially advantageous for ephemeral execution environments such as Heroku. For my project, the original image that I wanted to send is actually a snapshot of the most recent frame from the IP camera, so I would need to request a new image every time anyway. The camera has a URL that I can hit on my local network that will give me the current snapshot in a JPEG format (after providing a username/password of course).
Node.js streams can also be piped together, to accomplish combinations of operations while letting the JavaScript runtime manage memory and throughput — which it does very well. Streaming a file is almost always more efficient than reading the entire thing into memory when working with large files.
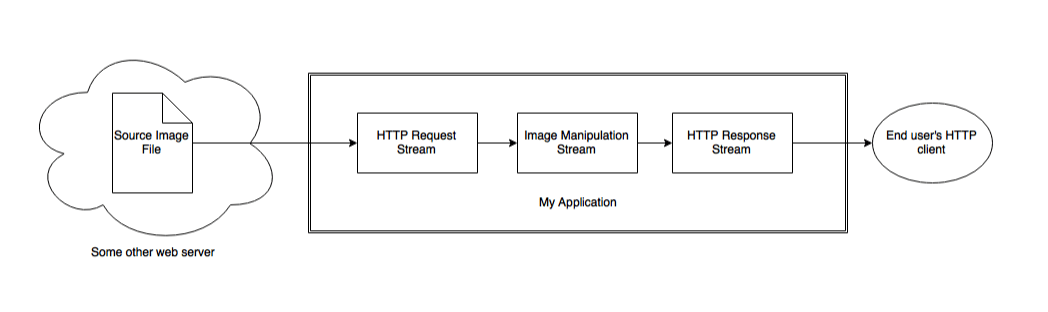
Piping the streams together
When a user agent (in my case a smartphone) makes an HTTP request to my application, my application will turn around and make an HTTP request to the source file (generated by my IP camera) that we want to send them. My application will then pipe that stream into an image manipulation stream, which will then be piped into the response for the user’s original request. Just think of it as a pipeline that looks something like this:
GraphicsMagick for Node.js
To manipulate the image, I am using the gm module for node. Following the instructions in the README.md, you’ll need to install either GraphicsMagick, or ImageMagick separately. On my Mac, I use Homebrew so I just run:
brew install graphicsmagickThe gm module can then be installed with npm:
npm install gmI am using Express to create a create a basic web API which my user agent can request. Based on the fileName parameter in the URL, I then make a request to my source image. In my sample code for this blog post, my IP camera is substituted out for an S3 bucket hosting a static file.
So an HTTP GET request to http://localhost:3000/images/IMG_4994.jpg will then make a GET request to https://s3.amazonaws.com/nguyer-test/IMG_4994.jpg. I’m using the handy request module for node which can treat the response as a stream. That stream is then passed into the gm module to make our alterations to the image. The gm module also can stream its result, which we finally pipe into the response to the orignal web request that our app received. The full application code looks like this:
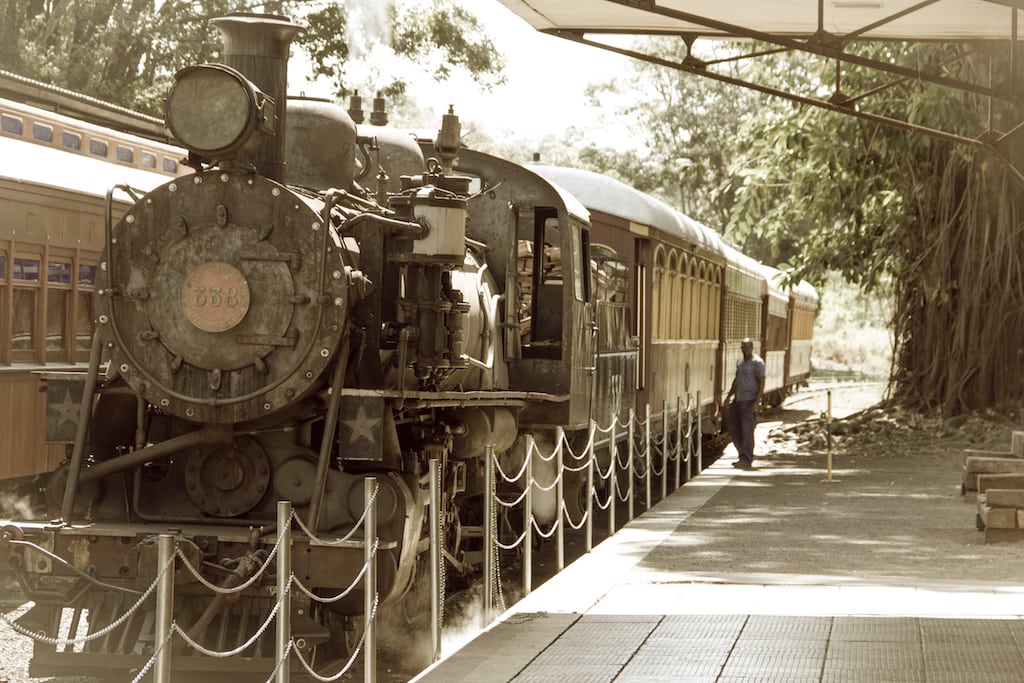
For this sample, my original image is a photo that I took in Brazil, of an old locomotive. View the full resolution photo here!
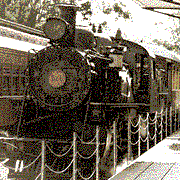
GraphicsMagick can do pretty much anything that you’d want to do to an image. Think of it like a (maybe simplified) Photoshop for the command line. In order to optimize the photo for displaying on the Pebble’s screen, I ended up doing the following:
- Crop the picture to a square (keeping only the interesting parts)
- Resize it to 180×180 pixels (the resolution of the Pebble’s screen)
- Bump up the contrast
- Map the colors to only the palette that the Pebble can display (I had a file called SOME_FILE_NAME that contained the correct palette)
- Dither the image to give the appearance of more colors
- Output the final image as PNG
The final bullet point was critical for my project. The Pebble sample code is written specifically to decode PNG files. Because JPEG is a totally different file format and encoding, it is not compatible. If you don’t specify a file type, GraphicsMagick will simply use the same format as the input file (in this case JPEG). In order to not totally confuse browsers (or other user agents) it is also highly recommended that you set the Content-Type header in your response object if you are explicitly setting the file type. My code does this on line 16.
Go forth and be creative!
Now that you know how to do images manipulations on the fly with Node.js, you can play around with all the features of GraphicsMagick. Try making a meme generator, or an automatic image resizer, or create some stylistic, artsy effects. Have fun!
Develop with Bandwidth
If you’d like to learn about how to develop with our APIs, request your free trial account.